Friday, November 13, 2015

Eclectic Elements - Backpack

Hello friends! Have you heard about the 
Tim Holtz Creative Journey Block Challenge with Eclectic Elements Fabric? There is lots of prizes…even a Bernina sewing machine. WOW! 


Join in and create your very own 12" x 12" quilt block using Tim Holtz Eclectic Elements fabric inspired by your creative journey.

Now through January 11, 2016, post on the Make It Coats Facebook page your 12" x 12" block made from Tim Holtz's fabric. Be sure to hashtag your block with #TimHoltzEclecticElements & #BerninaUSA to be entered.

Tim and a team of experts will select their favorite blocks which will be sewn into a quilt and featured at the Spring International Quilt Market in Salt Lake City May 2016. The best part is, your block could win one of our 24 fantastic prizes which include a Bernina sewing machine and yards of
Tim Holtz Eclectic Elements fabric!

Rules:
Quilt block must consist of approximately 95%
Tim Holtz Eclectic Elements fabric
Block must be 12" x 12."
Block must be posted to the Make it Coats Facebook page HERE on or before 1/11/16 for consideration. >
Contest is open from 11th November 2015 until 11th January 2016. Winners will be announced after 22nd January 2016.

As you all know I love to sew and Quilt Market was just a few weeks ago. I will be posting all the projects I made in the next couple of weeks. 
Backpack for Fall Quilt Market 2015
Tim Holtz Eclectic Elements Fabric 
Main fabric: Entomology
Accent fabric: Diamonds
Linning: French Script
Pattern: Simplicity #1388
The pattern includes a few styles of backpacks and a messenger bag. 

The pattern was pretty easy to follow. I did altered the pattern slightly by omitting the front pocket and adding the front band with contrasting fabric, hardware and the metal closure. 

The pouch pocket on the side can hold lots of goodies. 

The #6 patch on the flap is a fun detail that adds interest and the bugs are fun! I think my 10 year old Grandson would love this! 

Adjustable straps were added for a comfortable fit. There's even a loop at the top to hang up the backpack when not in use.  

A drawstring closure around the top helps keep all your items safe. 

I've been working on a new Christmas Card series for my blog and it all starts Monday! I hope you will join in on the FUN…..you won't want to miss it! 

Thanks for stopping in!
Richele

Wednesday, October 21, 2015

Tim Holtz Inspiration Series - Joy Burlap Panel

Hello friends! I am in love with the technique from the Tim Holtz 12 Tags in August. You can check out the full tutorial over on Tim's blog! Tim's tutorial has lots of step photos. So please check it out! 

The technique is fun and I think the results are AMAZING! 

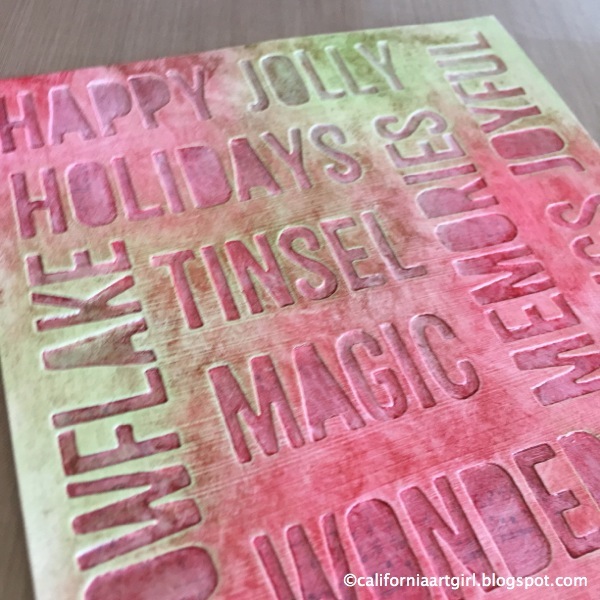
Cut a piece of Manila Cardstock about 1/2" smaller then the Burlap Panel. Die cut the words using the Thinlits dies with the Holiday #2 Block Words. It's a good idea to tape them down using Post it Note Tape or Tissue Tape. 

You will need to run the cardstock through 2 times to get enough words die cut. 

Adhere a piece of Yuletide Paper Stash behind the Manila using Multi Medium. Apply a layer of Multi Medium over the top and let dry. Once that's dry apply a thin layer of Gesso over the entire surface and with a paper towel wipe off the the gesso in the words and let dry.  

Apply Distress Ink directly to the surface. I ended up using Festive Berries, Mowed Lawn and a little Frayed Burlap Distress Ink. Using the Mini Distress Ink Pads work perfect for this because they are little. Apply a layer of Multi Medium over the top of the ink.  I found it helpful to wipe off my brush so the red didn't contaminate the green and vice versa.  

Use a paper towel with a light touch to blend the colors. If you're too heavy handed you will wipe the ink right off.

Wednesday, October 14, 2015

Tim Holtz Inspirations Series - Holiday Knit Card

Hello Friends! I'm back with another post for the Tim Holtz Inspiration Series. The projects have been amazing!!!! How cute is this Holiday Knit Thinlits die set. I loved how Jan Hobbins used the die on her project yesterday!

The Holiday Knit Thinlits would be great for cards, or a special holiday layout, even a band around a present would be fun. Can't wait to play more with this die. 

Die cut strips from Kraft-core cardstock using the Holiday Knit Framelits set. Thinlits are perfect for those intricate images, just look at how tiny these pieces are. 

Carefully sand the pieces with a Sanding Grip then ink the edges with Distress Ink on an Ink Blending tool. 

Apply a piece of felt or batting to a piece of paper with Glue Stick. The paper is just to keep it stable. Draw a line for lining up the edge of the Holiday Knit strips. 

Add stitching around each strip then ink the edges with Distress Ink. 

Sand card and mat with a Sanding Grip then add a little Distress Ink.

Choose a little message from Small Talk Occasions, sand the edges then add Distress Ink on an Ink Blending Tool. Small Talk Occasions has so many fun sayings to use on all kinds of projects. 

Love how the felt pops through the die cut and makes it look like a real sweater. 

Tie Linen Ribbon around the card with a bow. Use a Loop Pin  to add a Type Token and Wreath to the bow. 

I also made a Metallic version of the card using Metallic Kraft-core. 

You can create such cool effects using the Metallic Kraft-core. 
Sand the cardstock in a circular motion to give it a brushed metal effect. 
I also love how it looks when embossed with a Texture Fade The raised area stays shiny and the rest is more matte and every Texture Fade reacts a little different. 

Thanks for stopping in!
Richele


Saturday, October 10, 2015

Noel Wall Hanging - Sizzix Snowflake Duo and Billboard Bigz XL die

Hello! Today I want to share a wall hanging I made with some of the new Sizzix Alteration dies form Tim Holtz, the Snowflake Duo Bigz die 
and the Billboard Bigz XL. 

 I found a burlap panel (8 1/2" x 11") at my local craft store for my background, added the new Yuletide Paper Stash and lots of NEW Idea-ology goodies. Love the old time vintage feel of this new paper. Add some stitching around the edge and adhered the paper to the panel. Choose a few pieces from the Festive Ephemera Pack and use foam tape to adhere them to the canvas. Wrap a few pieces of the NEW Metallic Trimmings around the panel at the bottom edge of the papers. 

Die cut the snowflakes from the Snowflake Duo Bigz die and Texture Fade set using the Metallic Kraft-core cardstock. Emboss the snowflakes with the matching Texture Fade. The Die and Texture Fade come together in the set. 

Sand the Snowflakes with a Sanding Grip to reveal the core of the paper. Ink the raised area with Distress Ink on an Ink Blending Tool. Color Gumdrops with a drop of Alcohol Ink and adhere to the center of the Snowflakes. 

The little skater boy is from the Occasions Found Relatives. There are several Christmas images in the pack along with Halloween, Easter and more. Slip the boy into a Cabinet Card to frame it nicely and adhere to the panel.  

Friday, October 9, 2015

Stamp Asylum Upcoming Workshops!

Hi friends! I'm so excited to be heading to Plano, Texas (near Dallas) next week! 
I have a few openings in this beautiful Family Configurations Mini Book. Everything will be included to create this fun project, even a few vintage items. 

Family Memories Mini Configurations Book 


Even the kits are beautiful! 

Come venture into the unforgettable journey of configurations! Class will be filled with techniques using Ranger Distress Products and Idea-ology trinkets and treasures to transform an ordinary Mini Configurations Book in to a family heirloom. Bring your imagination and creativity to dream up your own story with the photos provided or bring special family photos and mementos to personalize your project. Your kit will be packed with all the supplies need to create this one-of-a-kind piece.
Sunday, October 18th  11:00 - 4:00 pm

Classes are filling fast…hope to see you their! 
If you have any questions call Stamp Asylum.
972-596-1224

Next stop Stampers Corner in Elk Grove, California. 
November 7th
More info to follow!

Thanks for stopping by!
Richele

Thursday, October 8, 2015

Junkin' makes me happy!

Hi friends! It's no secret that I like to go junkin (antiquing)! 
So off we went and by we I mean Paula and I (my junkin partner in crime). We headed out early (6:30am) to Three Speckled Hens in Paso Robles. Here is a few of my favorite photos from the day! 


Busy, busy, busy! 


Oh my look at all the ribbon! I wanted to buy it all and there was a lot! 
Only $10.00 for 3 rolls! MAJOR BARGIN! 

The deer head reminds me of Tim's new Trophy Antlers!


Loved this lawn mower! 


Here's the back of Paula's car with all our treasures form the day! 

Here are the thinks that came home with me... 

and this type tray was my favorite pick of the day! 

Best show EVER…found some amazing treasures! 
Thanks for stopping in!
Richele