
Hi Bloggers! I'm so excited to be a part of Melt Art Mania!
The projects have been amazing!!
And Ranger is giving away prizes, see the details at the end of this post.

There are so many different ways to use Melt Art. Wether you're a mixed media artist, a jewelry maker, a card maker, scrapbooker, or make home decor pieces, Melt Art makes it so easy. You can use UTEE, embossing powders, Bees Wax and so much more in the Melting Pot. There is something for everyone!

Melt Art embellishments are the focus of my card today. I've used UTEE, HeatIt Inks, Shrink Plastic and the Melting Pot of corse.

Using a Sharpie to trace around your hand onto a piece of Inkssentials Shrink Plastic.

Cut the hand shape out with scissors. Be sure to cut the Sharpie all the way off.
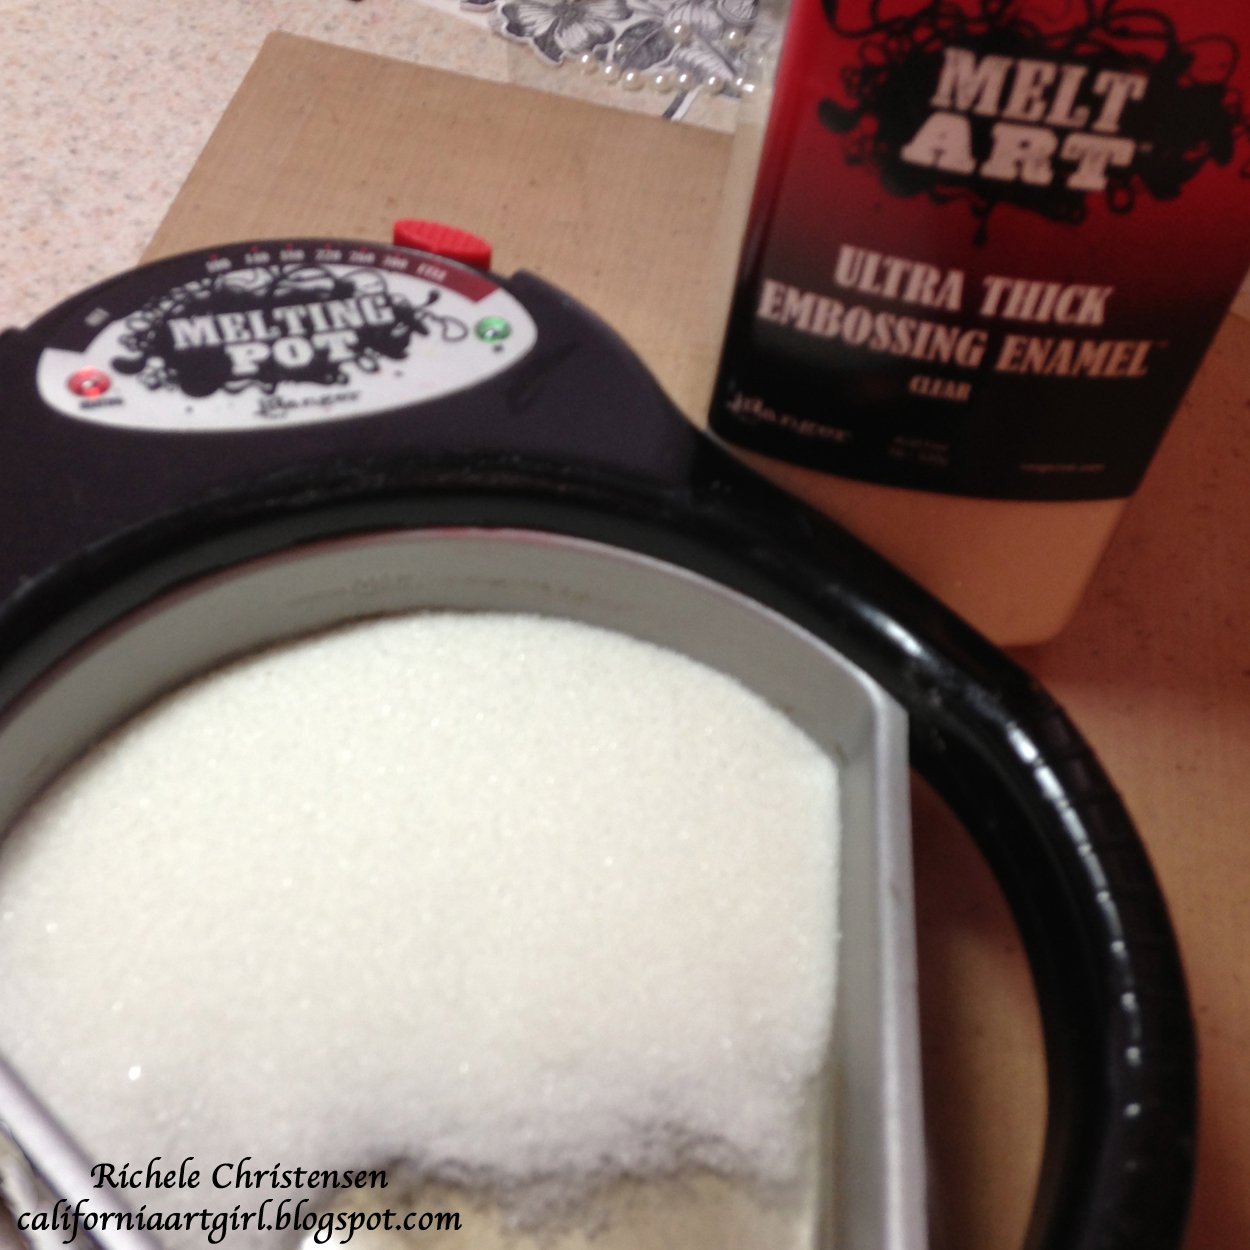
Working on a non-stick Craft Sheet, turn your Melting Pot onto the UTEE (Ultra Thick Embossing Enamel) setting. Pour a good amount of UTEE into the pot. Place the lid onto the pot and let heat/melt. Don't forget the Melting Pot and it's contacts get very HOT, so be careful!

Now to shrink the hand! I know the hand is huge compared to the pot put as soon as the hand hits the UTEE is will shrink. As the hand shrinks it will curl up, no worries, be patient and the hand will flatten back out.

Once the hand shrinks and flattens back out grab the hand with your tweezers. As you pull the hand from the pot drag it on the side to remove the excess UTEE off the bottom side of the hand.

Place the hand onto the Craft Sheet. Work quickly for this step as the hand will hardens as it cools.

Working on the back side of the hand scribble Glossy Accents all over the hand.

Place the hand onto a piece of card stock. As you set the hand on the paper swirl the hand to spread the glue out. Pick up the hand and press the card stock onto the uneven parts of the hand. Let dry then trim around the hand with scissors.

Now for the Heart! Add several drops of Garnet Heat It Ink to the melted UTEE. Stir gently. It's normal for the ink to bubble. The color should be red in color and should still be translucent. As the UTEE heats the bubbles should disappear. You can use a HeatIt Tool if necessary.

Die cut the heart from fun foam! Adhere dictionary paper to the back of the heart with a Collage Glue Stick.

Lay the heart onto your Craft Sheet. Make sure it lays flat.

Gently pour the red UTEE into the heart shape. TIP: Be carefully not to over pour.

Let the UTEE harden.

Peel back the fun foam template and the dictionary print. If necessary trim off any excess paper.

Now for the card portion of our project. Ink the edges of the background print and the Love ticket with Vintage Photo Distress Ink on an Ink Blending tool.

Sand and ink the card and card pieces with Vintage Photo Distress Ink.

Assemble the card then adhere the Hand and Heart with Red Line tape.

Tie twine around the hand with a bow.

Use the Tiny Attacher to attach the ticket.

Add Glossy Accents to the Signage Alpha Parts letters. Let dry.

I LOVE ART!

Here's a peek at the inside. Love this saying!

Here's the best part! Leave a comment here before midnight PST on June 2nd for a chance to win this fabulous prize pack from Ranger.
I'll announce the winner on June 3rd.
Thanks Ranger for inviting me to participate! Love your products!!
They're the BEST!
Thanks for stopping in and good luck!
Richele
Find all the fabulous products below at Inspiration Emporium!!
I'll announce the winner on June 3rd.
Thanks Ranger for inviting me to participate! Love your products!!
They're the BEST!
Thanks for stopping in and good luck!
Richele
Find all the fabulous products below at Inspiration Emporium!!
 |  |  |  |
 |  |  |  |
 |  |  |  |
 |  |  |  |
 |  |

Another cool melt art make .x
ReplyDeleteI love that heart! Looks amazing
ReplyDeleteI love that heart! Looks amazing
ReplyDeleteAwesome project Richele! (as always :D) I love your idea of the foam template for the Utee!! Totally cool! TFS!
ReplyDeleteGorgeous card!! Thank you for the tip and idea to use fun foam as a mold for utee... the possibilities for shapes are really endless now! Really like the heart and hand combo with the different background! Very creative!
ReplyDeleteWhat an innovative project! The heart is great and I love the way you did the hand, brilliant!
ReplyDeleteThis is a great project and reasonably simple in style. The foam stencil/mold is an excellent idea.
ReplyDeletelove it. the heart is gorgeous and looks like it is floating.
ReplyDeleteVery nice...I didn't know the UTEE would make such a nice 'instant' transfer from the dictionary paper. Wow!
ReplyDeleteWow, thanks so much for showing us how to do this.... Just love it! I want to try this so much.
ReplyDeleteFabulous project- love the look and all the techniques I learned! Ranger makes the best products!
ReplyDeleteGreat ideas - LOVE your tutorial! Thanks for the inspiration!
ReplyDeletethis is great, love the dimension. Thanks for sharing
ReplyDeleteM
that is sooooo cool!! and very inspiring, i want to run out and get all the goodies to make that :) thanks for the tutorial!
ReplyDeleteRichele, I love your melt Art card. I can't wait to try it. Thanks so much for your tutorial. :-)
ReplyDeleteBeautil card. And love the technique! Thanks for sharing.
ReplyDeleteOMG...I see a new obsession could easily get started with these supplies. Thank you for a chance to win.
ReplyDeleteThank you Richele, for sharing this technique. I love the heart and hand, they look so cool on the artful background. Great project, I just might have to try this Melt Art stuff. TFS!
ReplyDeleteMindy
http://mulberrymindy.blogspot.com
Love the red and black with the neutral colors! Fabulous tutorial and I so love that hand and heart! Brilliant!
ReplyDeleteLove the heart over the dictionary paper, great idea!
ReplyDeleteThis comment has been removed by a blog administrator.
ReplyDeleteoh this is just a fantastic piece! I love how the dictionary print shows thru the heart.
ReplyDeleteThis is so fun. Great tips and techniques. Thanks.
ReplyDeleteawesome tutorial!
ReplyDeleteWhat a fantastic idea with the shrink plastic hand!! You are always thinking of new things!! You never cease to amaze me!! Again another beautiful card!!
ReplyDeleteVery cute! I love the hand - I think doing the grandkids' hands for a grandpa card would be very cool.
ReplyDeleteI love that idea. Father's Day is just around the corner!
DeleteAWESOME!! I LOVE this FUN card and I think this would be FUN to do with the Kids!! Well letting them trace their hands and letting them watch it melt then letting them create something to put them on after they have cooled!! LOVE it!! THANKS for sharing and for the chance to win!! Have a FABULOUS WEEK!! =)
ReplyDeleteI would have never thought to use fun foam as a form to pour UTEE into. Amazing. Love your card, with all its layers and elements. I can see you put a lot of heart into what you make too. Great tutorial, Thanks for sharing your talent!
ReplyDeleteI've only just ordered my melt pot and I could use all the inspiration I can get!! Love this idea thank you so very much for sharing
ReplyDeleteHey Richele! What a beautiful project! I am going to do the hands! I love Vic's idea. No grands, but my daughters (31 and 20) will have to do for their granddaddy! Richele you are always on the money, girl! I am such a fan!
ReplyDeleteoohhh that's cool! A fun foam mold...my mind is spinnning like crazy! Thanks so much for a great tutorial!
ReplyDeleteI can't wait to try this--never knew about the fun foam!
ReplyDeleteI love the stencil/mold made of fun foam!! That is brilliant and gives me so many ideas. =) I need to actually get out my melting pot and use it! =S
ReplyDeleteGreat technique with the foam! Oh, the possibilities! Great tutorial. Thanks for sharing. I don't have a melting pot but I can see me having some fun with one!
ReplyDeleteThanx!! For sharing this awesom work i am falling in love with melt art..
ReplyDeleteLove the idea of using the foam to make a mold for the UTEE. I didn't realise how mush could be done with the melting pot. Your card looks great with your hand made embellishments.
ReplyDeletefabulous - lovin all of this melt art. Can't wait to try may hand at it!
ReplyDeleteThis is fabulous! I have fun foam so I can try this too! Thanks Richele and Ranger.
ReplyDeleteI love your project and did an oooh out loud when I saw how easy it was to make the heart. Now I have more to add to my must/lust have list!! xx Michelle
ReplyDeleteThat's awesome! I love the hand holding the heart, so sweet!
ReplyDeleteLOVE THIS RICHELE!! I learned so much which is good since I have not my meting pot ah...since I got it! lol This looks like a fun project, so glad you shared all the steps. I know that is a lot of work.
ReplyDeletepaula
xx
OMGOSH! I LOVE LOVE LOVE this!! It is adorable.....Thanks for showing all the steps....I can do this!
ReplyDeleteThis is fabulous!!
ReplyDeleteWhat a brilliant project... What I really love is the text on the back of the hand and the heart, so clever and looks amazing; and that it's your own hand too - how cool is that?!
ReplyDeleteAlison x
This comment has been removed by the author.
ReplyDeleteAwesome creativity - love the different uses and affects of the shrink plastic and UTEE. Definitely makes me want to use this innovative product in my mixed media art. Thank you for sharing your tips and tools.
ReplyDeleteSome gorgeous techniques again!
ReplyDeleteTruly stunning and another technique I'm going to try, thanks for sharing and great tutorial.
ReplyDeleteWhat an amazing cute project and so clever. thank you for taking part in Melt Art Mania and sharing your tutorial.
ReplyDeleteTotally Awesome card! What caught my eye was the deep red color of the heart! Loved your tutorial...can't wait to try
ReplyDeletethis project! Quick question...Is that saying on the inside
of your card a stamp? If so where can I get one?
Thanks so much!
Sherry
Hi Sherry!
DeleteThanks! You are going to love this technique!
Great questipn! The inside was stamped out with an alphabet set!!
Richele
WOW WOW WOW and more wow fantastic tutorial and gorgeous stunning card, I so love the idea of the hand and the foam heart to use as a mold, wow awesome idea I now am off to look at all my dies lol. Happy Crafting :-) Kezzy xxx
ReplyDeleteI am loving all these wonderful techniques-I think I need the large jar of UTEE!
ReplyDeleteOh I love your tutorial! I hope to be the winner of your's and Ranger's fabulous giveaway also! What awesome products!
ReplyDeleteGreat project Richele! Thanks for sharing and the chance to win :-)
ReplyDeleteWow ! That looks like so much fun. Am adding Melt Art supplies to my wish list.
ReplyDeleteRichele, leave it to you to make something so fun and inspiring! I knew I could count on you to hit this one out of the ballpark. Love it!
ReplyDeleteI love your project! Such great techniques that I can't wait to try!! Thank you!
ReplyDeleteWOW, It looks great!
ReplyDeleteThank you for a chance to win!
Anita H
Very cool! Love the hand idea...fantastic! Didn't think you could use UTEE with fun foam, thought it might melt! Will have to try that though! Thanks for sharing!
ReplyDeleteNow this really got my mind whirling...such good inspiratioin! Thank you.
ReplyDeletethanks for sharing with us this technique Great idea !
ReplyDeletebrilliant!!! great card- and love the shrink hand in the Utee, thanks for a chance to win a fab prize too, Debi x
ReplyDeleteHi, I just came across your Melt Art Products and I love them! The hand-heart-card and the candles are fabulous. I love them! I think I need to try Melt Art too!
ReplyDeleteBest regards,
Sonja
Love candles wrapped in textured Utee!
ReplyDeleteHi Richelle! I loved seeing the card today! It's so neat! The heart and hand are so smooth and shiny! Loved it! Thanks for the chance to win!! Talk to you soon! :)
ReplyDeleteWonderful card. Thanks for sharing.
ReplyDeleteLove it - such a simple design, but with great techniques. TFS
ReplyDeleteCool project! Love that heart!
ReplyDeleteGreat project! I just got my melting pot and am looking forward to learning how to use it!
ReplyDeleteThat is fantastic! It seems so straightforward and you have designed/executed this perfectly. Hugs, Jenny x
ReplyDeleteWhat a great tutorial. Thanks for sharing.the heart is fantastic.
ReplyDeleteWhat a great idea with the red heart and the foam..can't wait to try this out. Thanks for sharing your ideas and techniques. Beverley x
ReplyDeleteThis is a great tute! I just love it. Will definitely be giving it a go. I thought the foam would have melted with the heat from the UTEE!! Brilliant. Thanks for sharing and a chance to win, good luck to all!!! x
ReplyDeleteLove your project. So much I didn't know! Thank you.
ReplyDeleteLove your project! Thank you for introducing me to using fun foam with UTTE. I would have never thought of that myself. Thanks for all the photos with your tutorial, too.
ReplyDeleteoh I love the colors ... and the way you handled shrink plastic ... and the gleaming heart - very nice! Thanks again for the instructive tutorial!
ReplyDeletekind wishes, serafeena
What a great tute! Thanks for the reminder about the fun foam. Love your project!
ReplyDeleteThat was awesome!!!! Great Job!!! I'm looking forward to start making things. Thanks for sharing!
ReplyDeleteThat was awesome!!!! Great Job!!! I'm looking forward to start making things. Thanks for sharing!
ReplyDeleteDevastating that Ranger has now discontinued the entire Melt Art product line. So if you have some UTEE/FLEX, etc. still around, use it wisely!
ReplyDelete