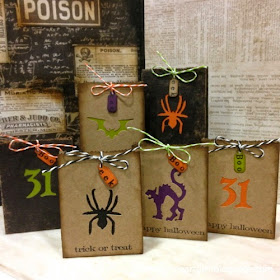
Hello friends! Our project today is all about quick! If you're like me you're always looking for simple projects at the last minute. I think these would be fantastic for your child's class or for a halloween party favor.
The dies we are using today are Movers and Shapers Dies. Movers and Shapers dies gives you the versatility to move the dies on the magnetic platform to create a shaped window where you would like it.
I set up the In the Bag Bigz die with several of the Halloween Mini icons. Some of my favorites for this project are the Mini Spider and 31, Mini Cat and Raven and the Mini Skull and Bat.
Die cut the In the Bag Bigz die using Kraft'core cardstock and don't forget to position the Mini Halloween Spider, Bat, Cat….they will die cut at the same time! How easy is that?
Use a strong adhesive like Rangers Wonder Tape to adhere the flap of the bag. Glossy Accents is also a great adhesive for our project.
Fold on all the score lines and adhere the flap to the bag. Assemble the bag by folding the little ends in on the sides, then fold in the other large flaps.
Push in the tab in to create the box bottom.
Ink the edges with Vintage Photo Distress Ink on an Ink Blending Tool. Adhere a 2 3/4" x 3" piece of Kraft'Core cardstock inside the bag over the Halloween icon.
After the bags were all together I decided to stamp a message at the bottom. Flatten the bag out then stamp with Jet Black Archival Ink using the Simple Sayings set.
This set is great for all occasions, it even comes with a little border.
Die cut some little tags from Kraft'core cardstock using the Tag Collection Framelits set. Love this set! So many different shapes and sizes of tags.
To stamp a little something on our tag I used these innovative stamps. They're Mason Row Pegz Stamps available through Stampers Anonymous. Just click them together kind of like Legos to create your words.
Create a few little words like boo or eek!
Stamp with Jet Black Archival Ink on to the tiny tag.
Punch a small hole at the top of the bag, tie Striped Paper Sting with a bow and don't forget to include the cute little tag.
Movers and Shapers dies are a great way to create custom projects!
Happy Halloween!
Thanks for stopping in!
Richele


These are ADORABLE! I love the treat bags. Too bad my kids are now teenagers. I would have made 100 of these for their classes. Pinning these :)
ReplyDeleteThe little treat bags are brilliant - even that creepy spider! I really want those stamps now....
ReplyDeleteAwesome bags Richele!
ReplyDeleteGreat project!
ReplyDeleteSo darn cute ... why didn't I think of that ?? :)
ReplyDeleteOkay MUST HAVE those stamps ... brilliant idea !!!
Love these! X
ReplyDeleteSo festive and quick to put together! Love that you customize them. Thanks for sharing.
ReplyDeleteThese are darling! Thanks for the cute idea :)
ReplyDeleteHow clever are these!!! LOVE them! And, love the click together stamps...didn't know about those!
ReplyDeleteThose letter stamps are too cool! Great little treat bags too.
ReplyDeleteSo much fun, Richele! These little Halloween treat bags are too cute and look like a good amount of yummy nummies fit inside! :) That's important ;) Thanks for the tutorial :) XOXO-Shari T.
ReplyDeleteThose are soooooooo cool. I love everything about them. What a personal touch to any party. I've gotta find those letter stamps :) Thanks for the inspiration!! -- Mary Elizabeth
ReplyDeleteSo very cutr!
ReplyDeleteCuuuute bags! very clever with the cut outs in them. Hope those alphabet stamps are too expensive, just what I need.
ReplyDeleteWhat a great project!
ReplyDeleteThese are the cutest! Just the right touch without being overdone. Love them! So much, in fact, that I had to order the bag die and a set of those letter stamps. Thanks for sharing!
ReplyDeleteoh!! love this project! I can picture doing this as an advent type for Christmas!! and I had no idea about those clicky letters!! must look into them further!!
ReplyDeleteDid you say simple??? It's way beyond 'my' simple. Such a clever idea. You guys on the design team are rockin it, I'm just saying! TFS.
ReplyDeleteRichele, I made some of your cute little bags and thought you might like to see the result. The letter stamps worked great (got mine through Amazon). I used glitter cardstock behind the openings and the dies I had on hand. Thanks again for the inspiration and tutorial! Here's a link http://www.creatinginacottage.com/2014/11/halloween-crafting.html
ReplyDeleteHappy Halloween Quotes 2018
ReplyDeleteFunny Mens Halloween Costumes DIY
Halloween Sayings For 2018
Costumes Ideas for Teenage Girl
Hilarious Couple Costumes
Pilgrim Costumes for Kids
Cute Halloween Quotes
Tumblr Halloween Costume Couples
Funny Drunk Halloween Costumes
Happy Halloween Animated images
Halloween Messages
Freaky Halloween Facts
Halloween Meme Party Ideas
Halloween Trick or Treat sayings
Cute Halloween Phrases
Homemade Halloween Masks Adults
2018 Halloween Costumes for Kids
Halloween Gif 2018
Homemade Native American Costume Ideas
Halloween Costumes Tumblr
Old Halloween sayings
Cute Halloween Sayings Quotes