
Hello friends!
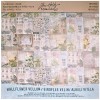
Today is all about Tim's new Wallflower Vellum. I'm in love all over again! The designs are from the Wallflower Paper Stash. I love how sheer it is and the printed design will add a little texture to whatever you create.
Sometimes when new product comes I feel like Inspector Clouseau…what if I…maybe I can… and then there is the happy accident.
Sometimes when new product comes I feel like Inspector Clouseau…what if I…maybe I can… and then there is the happy accident.

My happy accident is that you can use Distress Stain or Ink on the back side of the vellum to color it.

Here is the vellum! Think of all the possibilities.

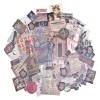
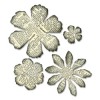
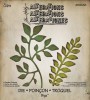
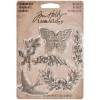
To make our flowers, die cut the vellum using the Tattered Flower Garland Decorative Strip, Tattered Florals Bigz die and Garden Greenery Bigz die.


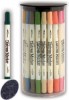
Color the die cut pieces with Distress Stain. You can see on the left the stain just beaded up on the surface. But if you work on the backside of the vellum the Distress Stain work beautifully. As you wet the flowers with the Stain the flowers it will begin to crinkle up. Another happy accident!


Dry the flowers with a heat tool.


Stack the flowers up from smallest to largest and insert a brad in the center. Keep the prongs of the brad straight while you continue to work with the flower. This will help you hang onto them.


Press the flower into the Distress Embossing Ink pad. Sprinkle with Clear Embossing Powder and shake off the excess.

The powder will be some what random. This is perfect.

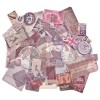
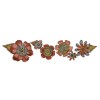
Look at how the Vellum flowers turned out!
Create several flowers of varying sizes and set aside.

Color some leaves from the Garden Greenery Bigz die using Distress Stain.

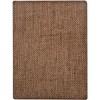
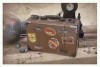
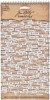
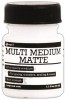
Tear a piece of Tissue Wrap for the front of the Burlap Panel. Paint the Panel with a generous coat of Multi Medium.

Adhere the Tissue Wrap to the front of the Burlap Panel. Paint over the top of the Tissue Wrap with Multi Medium just like you would decoupage something and let dry.

Add a little color to the background with Distress Paint. I love the way Distress Paint can be translucent when you use a thin coat.

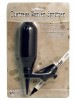
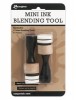
After the Distress Paint dries add some Distress Ink with an Ink Blending Tool to the edges of the panel.

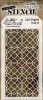
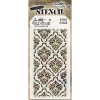
Position your Layering Stencil on the edges of the Burlap Panel then add some spritzing with Distress Marker and the Distress Spritzer.
It's all about the layers!


Color your Crinkle Ribbon by applying Distress Stain directly to your Craft Sheet and spray the Crinkle Ribbon with water. Pick up the stain with the ribbon. Repeat to add more color as desired.

Dry with a heat tool scrunching the ribbon as it dries.

Tie the Crinkle Ribbon around the canvas with a big bow.

Using a sanding grip sand the face of the Letterpress letters. Color the Letters with Distress Stain and let dry. Lightly ink the edges with Walnut Stain Distress Ink on an Ink Blending Tool.

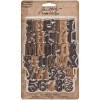
Paint the Botanical Adornments with Distress Paint, let partially dry and wipe of excess paint with a dry cloth revealing the metal on the raised areas.

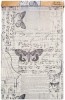
Adhere pieces of Thrift Shop Ephemera to the panel. Because the ephemera is vellum you can see the burlap through the piece. Love this!

Adhere the Letterpress blocks and choose some ChitChat to create a verse. Ink the edges of the ChitChat, adhere to the panel, paint over with Multi Medium and let dry.

Once the ChitChat is dry draw around the words with a Black Soot Distress Marker and smudge it with your fingers.

Adhere the flowers, leaves and a few more pieces of Thrift Shop Ephemera tucked in behind the flowers.

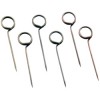
Adhere the Butterfly Adornment to a Memo Pin and add to the Burlap Panel.


What do you think of the new Vellum now?
AMAZING!!
Are you thinking of what you will create?
Have you seen these inspirational projects….


Thanks for stopping by!
Richele


55 comments:
If I am totally honest I was not sure about the vellum but after seeing your tutorial I am well and truly hooked! Now I cannot wait to get them. Your canvas is absolutely stunning Richelle!
Absolutely gorgeous, those flowers are stunning and add so much dimension and texture to your design. Delightful piece of art. Tracy x
Beautiful piece Richele! It's great to see what you can do with this vellum. Thanks for sharing!
WOW! This is gorgeous!
these are really beautiful Richele... you may have converted a "non-vellum" lover in to a vellum fan. x
SOOOOO beautiful. I'm always so impressed by people able to work in so many layers!
absolutely gorgeous!!!
LOVE everything about this project!! Thanks for sharing....and for the cool "tips"!
Richele as always beautiful and creative in every way possible. Awesome.
Stunning!!! I am almost at a loss of words. Those flowers are flat out amazing...so deep and rich, full of texture and colors. And the balance!!! Yummy! If for any reason, you know, like your walls are too full, suddenly you've lost the contact information to your actual friends and family, whatever, you don't have a place to put this, i am HAPPILY volunteering to take it off your hands. It speak to me - very happily. Just this moring, I was thinking, phew, there's a paper group I don't need to get. WRONG. I can't wait to try this. Thanks so much for the inspiration Richele....
absolutely stunning project. fabulous use of the vellum!
That is just RIDICULOUSLY BEAUTIFUL! Wow! I am just awestruck!
BLOWN AWAY here!!! Oh my creative word! It's so gorgeous, elegant, and just a delight for the eyes!
I gotta tell you ... YOU SOLD ME! These flowers are the most beautiful flowers I have ever seen. EVER.
SuZeQ
Absolutely beautiful. Thank you for the inspiration.
You ROCKED this GIRLFRIEND ... absolutely GORGEOUS ... the flowers ... OMG... just BEAUTIFUL !!!
Amazing work!
Very pretty and
thanks for the tips.
Carla from Utah
This is fabulous!!
Beautiful canvas! Love the flowers. Thanks for the tips on coloring vellum.
I love accidents, so awesome, Great tips and I cant wait to try this!!! so cool!
Absolutely stunning Richele! Thank you so muh for sharing and inspiring us! Yay for happy accidents!
WOW! AMAZING and BEAUTIFUL!!
I love your burlap panel! So many beautiful details to it, you did an awesome job!
I am truly amazed, love all the layers. Love the translucency of the velum and all of the wonderful texture in your canvas.
wow....Simply beautiful.....
Those vellum flowers are awesome! Love that panel... Can't wait to get my hands on the new vellum!
Gorgeous project and a fab technique! Love those happy accidents! I figured there must be something unique about Tim's vellum : )
Richele, wow what a stunning canvas! From the tissue wrap that just seems to part of the burlap to the beautiful flowers. Thanks for sharing your happy accident.
Beautiful project!!! love the new vellum!!
An absolutely stunning creation and those flowers are gorgeous!
I love that Bouquet, Richele!!!!! Omg! It's so beautiful. The whole canvas is gorgeous. TFS!
Oh it's so beautiful, the flowers look like porcelain, so fragile, thanks for the inspiration!
This burlap/tissue paper/vellum combination is simply gorgeous! I will definitely be having a go at this soon - thank you for sharing!
Wow love your work
This is positively beautiful! Love the colors and how you used the letterpress letters.
Stunning! Thanks for the inspiration!
GORGEOUS!!! Richele, this is spectacular! Loving the new TH printed vellum! I've always loved vellum and there really hasn't been a 'good' printed vellum....Until Now!! Wonderful burlap creation!! XOXO-Shari
Totally gorgeous
Gorgeous, feminine, artsy, colorful and sooo dang pretty all on one panel! That's a ton of work! I just bought some burlap panels and I'm going use your technique for the multi medium and lay down some tissue. It's such a pretty technique and makes a great substrate. I'm also experimenting with joint compound (similar to plaster) as a background....we'll see how that goes! Thanks for sharing your steps!
Love your panel! I love the idea of spritzing through Tim's stencils for the subtle background! Your flowers rock! Absolutely beautiful!
beautiful!
Sandra ltb
This is gorgeous! Love it
What an awesome way to use Vellum and love the way you use burlap panels. Make me realised that I've got so much to learn from gurus like you!
Just beautiful! Thanks for the "how to". I already love the Wallflower paper pad, so of course the vellum is a must have.
Brilliant use of the vellum to create those stunning flowers... the whole piece is just glorious!
Alison x
I have always loved vellum...but I've never created anything THIS fabulous with it! WOW! It's a great inspiration to help this girl dream much BIGGER! Thank you for all of the great tips! Waiting on your next book!
He IS Able!
Traci Starkweather
beautiful. thanks as always for sharing.
This is just gorgeous... thank you for the details on your process... how fun that must have been to make !
What wonderful things I have learned from your post today! The layered inked, embossed blooms are gorgeous - love the ribbon, the paint on the background and metal pieces - a beautiful wall hanging!
So much fun! Thanks for the great pictures of what you created. Love it and the new vellum...cannot_wait_to_get_some....eeeeh
This is a gorgeous work of art! Such great colors and a creative use of every little detail. Thank you so much for sharing.
This is incredible! Stunning attention to detail.
Rebecca.
Fab project love love love it all
oooh! That is stunning! I am not such a distressing fan but you have converted me! the vellum flowers are unbelievable!! Thanks so much for sharing!
Post a Comment