Hello friends! I'm always inspired to create a project that has many uses. I think this Happy Crossbody Bag will be perfect for a trip to the coffee shop with my computer and favorite book in it, a weekender bag, a great place to hold my favorite knitting or crocheting project or a purse with all the things in it.
I love the sweet look of the new Memoranda fabric designed by Tim Holtz for Freespirt Fabrics. I absolutely adore the lining fabric with the soft yellow background and the sweet little gold, red and turquoise flowers.
Fabric Requirements:
A Memoranda Paris PWTH101MULTI 1/4 yard (22.86cm)
B Memoranda Franc PWTH098GOLD 1/4 yard (22.86cm)
C Memoranda Receipt PWTH102AQUA 1/4 yard (22.86cm)
D Memoranda From Camden PWTH092MULTI 3/4 yard (68.58cm) Lining
E Memoranda Horticulture PWTH094AQUA 1/4 yard (22.86cm)
F Provisions Amber PWTH115AMBE 1/4 yard (22.86cm)
G Linen Neutral 1/2 Yard (45.72cm)
Additional Requirements:
2 1/2 yards (2.29m) Fusible Woven Interfacing Pelon SF101 - 20”(50.80cm) wide
(1) Magnetic Closure
(1) D-ring 1 3/4” (4.45cm)
Thread to match
Sewing machine and supplies
Rotary cutting supplies
Select fabrics for your bag and get ready to cut!
Cutting:
Fabric A, cut:
(2) 1 3/4” x WOF (4.45cm)
Fabric B, cut:
(2) 1 3/4” x WOF (4.45cm)
Fabric C, cut:
(2) 1 3/4” x WOF (4.45cm)
Fabric D, cut:
(2) 1 3/4” x WOF (4.45cm)
(2) 15 1/2” x 15” (39.37 x 38.10cm) (lining)
Fabric E, cut:
(2) 1 3/4” x WOF (4.45cm)
Fabric F, cut:
(1) 1 3/4” x WOF (4.45cm
(2) 7” X 7” (17.78 x 17.78cm) (pocket 1)
(2) 10 1/2” x 7” (26.67 x 17.78cm) (pocket 2)
Fabric G, cut:
(2) 15 1/2” x 6 1/2” (39.37 x 16.51cm)
(2) 15 1/2” x 3 1/2” (39.37 x 8.89cm)
Woven Interfacing, cut:
(4) 15 1/2” x 6 1/2” (39.37 x 16.51cm)
(2) 15 1/2” x 3 1/2” (39.37 x 8.89cm)
(2) (2) 15 1/2” x 15” (39.37 x 38.10cm)
(1) 7” X 7” (17.78 x 17.78cm). pocket
(1) 10 1/2” x 7” (26.67 x 17.78cm) pocket
(1) 3 1/2” x 4 1/4” (8.89 x 11.43cm)
(3) 3 1/2 x 20” (8.89 x 127cm)
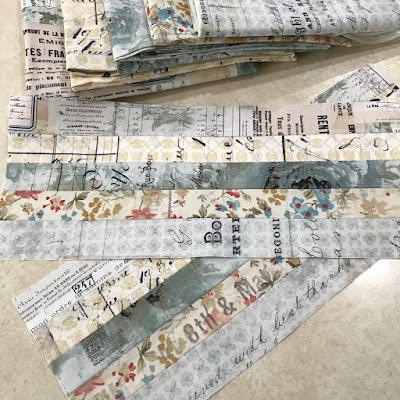
Sew 5 different strips together as desired.
Press seams open then cut 2 pieces to 15 1/2" wide.
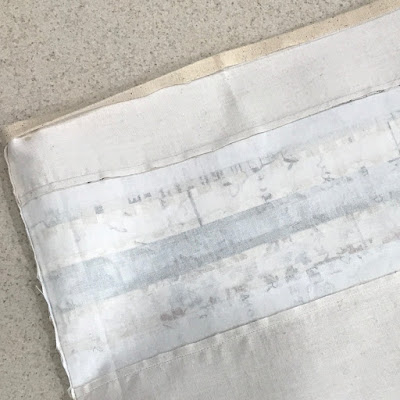
Press fusible interfacing to the wrong side of fabric pieces.
Attach fusible interfacing to the wrong side of the corresponding linen fabric pieces. Sew 15 1/2” x 6 1/2” (39.37 x 16.51cm) linen to the bottom of sewn piece from above. Press seam towards the center. Sew 15 1/2” x 3 1/2” (39.37 x 8.89cm) linen pieces to the top of the sewn piece right sides together. Press seams towards the center. This will be the main pieces of the bag (front and back).
 Draw a line 1 1/4” (.64cm) in from the sides and 1 1/4” (.64cm) in from the bottom. Cut out the little squares with scissors.
Sew the sides and the bottom of the bag and press seams open.
Sew corners by pinching the cut corner together with RST (right sides together). Align the side seam and bottom seaman pin together. Sew 1/4” (.64cm) from edge.
Attach fusible interfacing to the back of the pocket pieces (one of each size) 7” X 7” (17.78 x 17.78cm) and 10 1/2” x 7” (26.67 x 17.78cm). Attach fusible interfacing to the back of the lining pieces 15 1/2” x 15” (39.37 x 38.10cm). Sew RST leaving a opening for turning, clip corners, turn right side out and press. Top stitch close to the edge and about 3/4” (1.91cm) and 1” (2.54cm) from the top of each pocket.
Attach fusible interfacing to the wrong side of the lining fabric. Position sewn pockets to each lining, centered side to side and 3 1/2” (8.89cm) down from the top. Sew around the sides and bottom of the pocket 1/4” (.64cm) from the edge.
Add a seam down the center of the larger pocket to create two compartments if desired.
Instal magnetic closure 3/4” (1.91cm) down from the top edge of the lining piece. (Please follow manufactures instructions for closure). Mark with a pencil and cut a small slit.
Insert metal tabs, attach washer and fold tabs down.
 Draw a line 1 1/4” (.64cm) in from the sides and 1 1/4” (.64cm) in from the bottom of the lining pieces. Cut the square out with scissors.
Sew the sides and bottom of the lining pieces. Sew corners by pinching the cut corner together with right sides together. Align the side seam and bottom seam and pin together. Sew 1/4” (.64cm) from the raw edges.
Draw a faint line on the back side of linen bag with a pencil or water soluble pen/tailors chalk 3/4” (1.91cm) down from the top edge.
Fold fabric edge down to meet the line and press. Roll seam down again and press to create a rolled seam.
Insert lining in to bag with WST (wrong sides together) lining up to the pencil line. The top of the lining should meet the pencil line and pin in place. Fold over the rolled linen and top stitch close the the edge.
Add another row of stitching as desired.
 Make a small piece to hold the “D” ring. Sew 3 of the 4” X 1 3/4” (10.16 x 4.45cm) pieces together, trim to 3 1/2” x 4 1/4” (88.9 x 11.43cm) and attach fusible interfacing to wrong side of strap, fold right sides together and sew on long edge, turn right side out and press.
Attach “D” ring around small strap. Overlap the small strap in the back and stitch down.
 Center the strap on the side of bag meeting the strip piecing of the bag about 2 1/2” (6.35cm) down from the top. Top stitch with a square and an X in the middle of the square.
Piece the handle using the remaining 1 3/4” x WOF (4.45cm x WOF) strips. Cut strips in to 4" X 1 3/4” (10.16 x 4.45cm) pieces of fabric, sew the pieces right sides together in no particular order to create a 4” x 50” (10.16 x 127cm) strap. Trim sewn piece to 3 1/2” x 50” (10.16 x 127cm). Sew fusible interfacing together at a 45 degree angel to create a 3 1/2” x 50” (10.16 x 127cm) piece. Attach fusible interfacing to wrong side of strap.
fold right sides together and sew down the length of the strap adding a 45 degrees angle at one end and leaving the other end open for turning. Turn right side out and press. Topstitch
close to the edges.
 Fold raw edge of strap end under 1/4”(.64cm) and sew close to edge. Sew the long strap to the other side centered and about 2 1/2” (6.35cm) down to meet the piecing. Top stitch with a square and an X in the middle of the square to secure.
Tie strap to “D” ring at desired length.
 And just like that a new fun bag to use has been created. I can't wait to take mine on my next adventure!
To see the full line of Tim Holtz fabric visit Free Spirit Fabrics here.
Check your local fabric store for more information!
Thanks for stopping by!
Richele


