Thursday, February 14, 2019

Mini Love Cards - Happy Valentines Day!

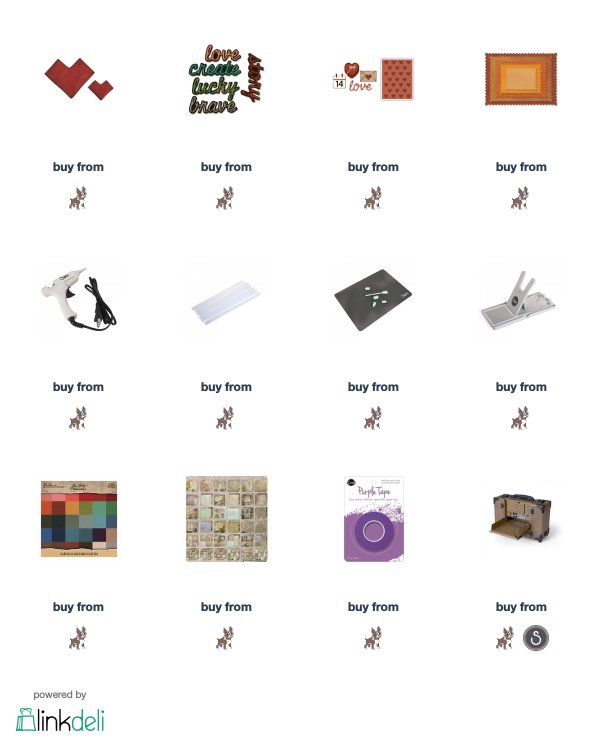
Hello friends! Happy Valentines Day everyone! I love creating different shaped cards and making them small always adds the cute factor. Did you know you can use your Thinlits dies to create a folded card? It’s all in how you line up the die on the fold of your base card and look how perfect the Faceted Heart is on these cards. 

Mini Love cards!


Score and fold cardstock in half. The cardstock should be a little larger then the die you’re using. Place folded cardstock just below the blade on the die and tape with low tack tape. Die cut card with the Stacked Postage Stamp Thinlits Die.

Die cut the Faceted Heart from colored cardstock.

Cut cardstock to fit the front of card and add stitching as desired. 

Die cut “Love” from the Shadow Script and/or Valentine SideKick Side-order Thinlits die using colored cardstock. Fold Faceted Heart on all score lines and ink edges with Distress Ink on an Ink Blending Tool. Ink edgers of all the pieces as desired. 


Glue Faceted Heart together using the Sizzix Glue Gun

Tie ribbon around cardstock with a bow and then adhere layers to card. 
Adhere Faceted Heart and flowers to card.

These adorable cards will be perfect for the ones I love on Valentines Day. 

Thanks for stoping by! 
Richele

Sunday, February 10, 2019

Blog Hop Winners!

Hello and happy Sunday! 
Thank you all so much for stopping by all the blogs and leaving comments, I hope you were inspired I know I was. 
Now for the winners!


From Tami B's Blog "Plays Well With Paper"

Mel Roberts-Hareld said...
Tami...what a beautiful, beautiful home decor piece! You have hit it out of the idea•ology PARK, with this project! Wow! (your directions are terrific, too, as always)

From Debi Adams Blog "Doodles In My Sketchpad" 

You know what amazing me about your projects? You incorporated paper crafting into something unexpected! That wreath and birdhouse… thought those were floral greens and flowers from the craft store not created out of paper. And I gotta tell you I am now on the look out for a vintage watercolor tray to recreate your daisy project. Thanks for all the unique inspiration!

From Mae Nazareth's Blog "Just A Little Bit Sweet"
Tiffany Hopkins says
February 6, 2019 at 10:25 PM
Beautiful card, love the bees!

From Bobbi Smith's Blog "Vintage Muse Designs"

Dana M said ....
February 7, 2019 at 9:58 PM
Wow, amazing project! Incredible layers of colors, textures and patterns - so much depth and interest.

Congratulations to all the winners...
Please email me your address at californiaARTgirl@me.com 
I'll get the prizes off to you this week. 
Thank you all so much for participating in the Blog Hop. 
Richele


Tuesday, February 5, 2019

Tim Holtz - Creativation 2019 - Blog Hop

Hello friends! Welcome to the Tim Holtz - Creativation 2019 Blog Hop and give away. It's going to be a great hop full of amazing projects and inspiration! I hope you enjoy all the beautiful project from the talented artists. 
The Tim Holtz booths included Idea-ology, Ranger, Sizzix, Stampers Anonymous and Tonic Studios. A special thanks to Tim Holtz for inspiring us, creating products we all love to use and being so innovative with new products. Thanks to Mario for all the BTS! and a big thank you to Paula for all her hard work and dedication. 


First I took a paper cache heart and cut it in half with scissors. 

Cover the outside of the heart with Collage Paper using Distress Collage Medium in Vintage. Brush the heart with the Collage Medium then carefully res the Collage Paper to the heart, continue working until it's completely covered and let dry or dry with a heat tool.

Sand the edges to remove the excess Collage Paper. 


Apply a thin coat of Collage Medium over the top of the Collage Paper. 

Repeat the process and cover the inside of the heart. don't forget to apply a layer over the top to seal. If the inside of the heart is dark you may want to paint it a light color. 

Add Gadget Gears, Mini Gears, Sprocket Gears, Game Spiners, Keys, Story Stick, Pocket Watch. Hardware Heads etc... Use small wood blocks and/or foam tape to add gears at different levels.  


Once you're done here please head over to 
Stacy Hutchinson blog to see her gorgeous project! You are sure to be inspired! 
But before you leave please leave a comment below for a chance to win some prizes. Comments must be posted by midnight on February 9th and winners will be announced on the 10th. 

CREATIVATION 2019 BLOG HOP
Thanks to everyone below for sharing their inspiration!

Products for making this project available at Simon Says Stamp.