
Hello Friends! I had a chance to have some fun using the Tim Holtz Distress Glazes with Distress Paste. I wanted to see the difference and how the Glazes would react with the different Pastes. First up I always like to create a color chart so I can see the colors. You can download the charts on the Ranger Ink website HERE. Ranger Ink has color charts for the Tim Holtz products line along with stickers to add your products. It's easy to download and print them on cardstock or sticker sheets. I LOVE being organized! Ranger Ink also offer the Storage Tins for many of Tim's products.

Gather some supplies and let create together!
* Distress Glazes
*Distress Paste
(Crackle, Texture and Grit Paste in both Opaque and Translucent)
*Palette Knife
*Mixed Media Heavystock
*Layering Stencils
*Container of water to put your Stencils in
*Embossing Tool / Heat Tool
Optional
*Spray Stains
*Stamps
*Archival Ink
To get started have all you materials ready to go. Find the colors of Distress Glaze you'd like to use and unscrew the lids. Have an area you can set you pieces off to the side so not to disturb them until they are dry and heat embossed.

Tape down the Layering Stencil to a piece of Mixed Media Heavystock. Using a Palette Knife scoop out a little paste and spread through the stencil. Keep the Palette Knife at an angle and gentle scrap off any excess paste and return to the jar. Replace lid. Carefully remove stencil and place the stencil in a tray of water. (You can clean these later)
TIP - It's important to keep the lid on when not in use as the product will dry out if too much air gets to it.

Pinch a small amount of Glaze between your fingers and slowly move your fingers back and forth to sprinkle color on to the paste were desired.
TIP - Start with the thiner portions of the design. Sometime the paste dries quickly in those areas and the Glaze won't stick.

Continue to add color as desired. Shake off excess and set aside to air dry.
TIP - Feel the back of the design and if it's cold it will need more dry time.
Do not rush the dry time by using a heat tool as the paste will bubble.

Once the paste has dried heat emboss the powders until the Distress Glaze melts and turns glossy.
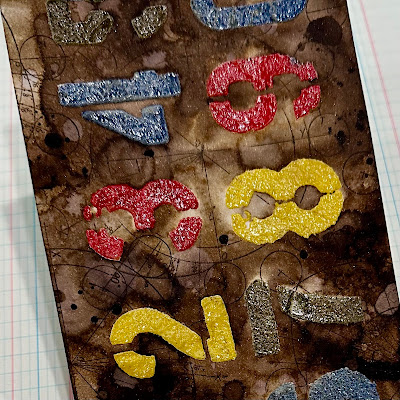
Here are the results of Distress Glaze on different Texture Paste.
Once I heated the glaze I added some Spray Stain to the backgrounds, sorted with a heat tool then added a little stamping with Archival Ink. I love the dimensional look of using the Distress Glaze with Paste.

Opaque Crackle Paste

Translucent Crackle Paste

Opaque Texture Paste


Opaque Grit Paste
I love the dimensional look of using the Distress Glaze with Paste.
I hope you will try using Distress Glaze with Distress Texture Paste!
Have fun experimenting!
Thanks for stopping by!
Richele

4 comments:
These are amazing!
WoW all are beautiful & unique!! Thanks much for taking the time to share your tutorial 🩷
Ah - this is great info! I have some glazes but really don't use them much. And paste is so messy!! But with what I have learned here and previously from a class from Cheiron, I bet I can do this! Sure miss seeing you and learning from you in person but you continue to be such an inspiration. Hugs!
So fun to play with the stencils, pastes, and embossing glazes! I love the results you achieved with yours, I think my favourite is with the Opaque Crackle & Glazes. Thank you for sharing, you are so multi talented!!
Post a Comment